How to Run a Successful A/B Test in Webflow Using Webflow Optimize


TL;DR
A/B testing turns guesswork into growth by helping Webflow users make data-backed design and content decisions.
The shift: instead of relying on gut instinct, teams can now test variations directly in Webflow using Webflow Optimize, no code required.
The insight: one clear hypothesis and consistent tracking can reveal which elements truly move conversions.
The takeaway, treat testing as an ongoing system, not a one-time task. Every insight compounds into higher performance, better UX, and measurable business impact.
A/B testing is one of the most effective ways to improve your Webflow site’s performance, conversions, and user engagement. Whether you’re testing CTAs, layouts, or page speed optimizations, data-backed decisions lead to better results.
With Webflow Optimize, A/B testing is now easier and more streamlined, allowing you to experiment directly within Webflow without complex external integrations.
In this guide, we’ll cover:
- How to set up A/B testing in Webflow using Webflow Optimize
- Best practices for running effective experiments
- How to analyze results and implement changes
- Alternative tools like Optimizely, Hotjar, and Optibase to enhance A/B testing
Let’s dive into the process of optimizing your Webflow website with data-driven decisions.
Why A/B Testing in Webflow Matters
A/B testing (also known as split testing) involves showing two different versions of a webpage to users and measuring which one performs better.
This allows Webflow users to:
- Increase conversion rates with optimized headlines, CTAs, and design elements
- Improve user experience by testing layouts and navigation
- Reduce bounce rates and drive more meaningful interactions
Now, with Webflow Optimize, running A/B tests is more seamless than ever.
How to Set Up A/B Testing in Webflow with Webflow Optimize
Webflow Optimize is Webflow’s native A/B testing tool that lets you test different design and content variations without needing custom code.
Step 1: Define Your Hypothesis
Start by identifying what you want to test. Examples:
- “Changing the CTA button color from blue to green will increase click-through rates by 20%.”
- “A shorter form will increase sign-ups.”
Having a clear hypothesis ensures your test provides actionable insights.
Step 2: Create Your Variations
Inside Webflow:
- Duplicate your page and modify only one key element (CTA, heading, layout, etc.).
- Label your variants clearly (e.g., “Version A - Original” and “Version B - New CTA”).
- Keep everything else consistent to isolate the impact of your change.
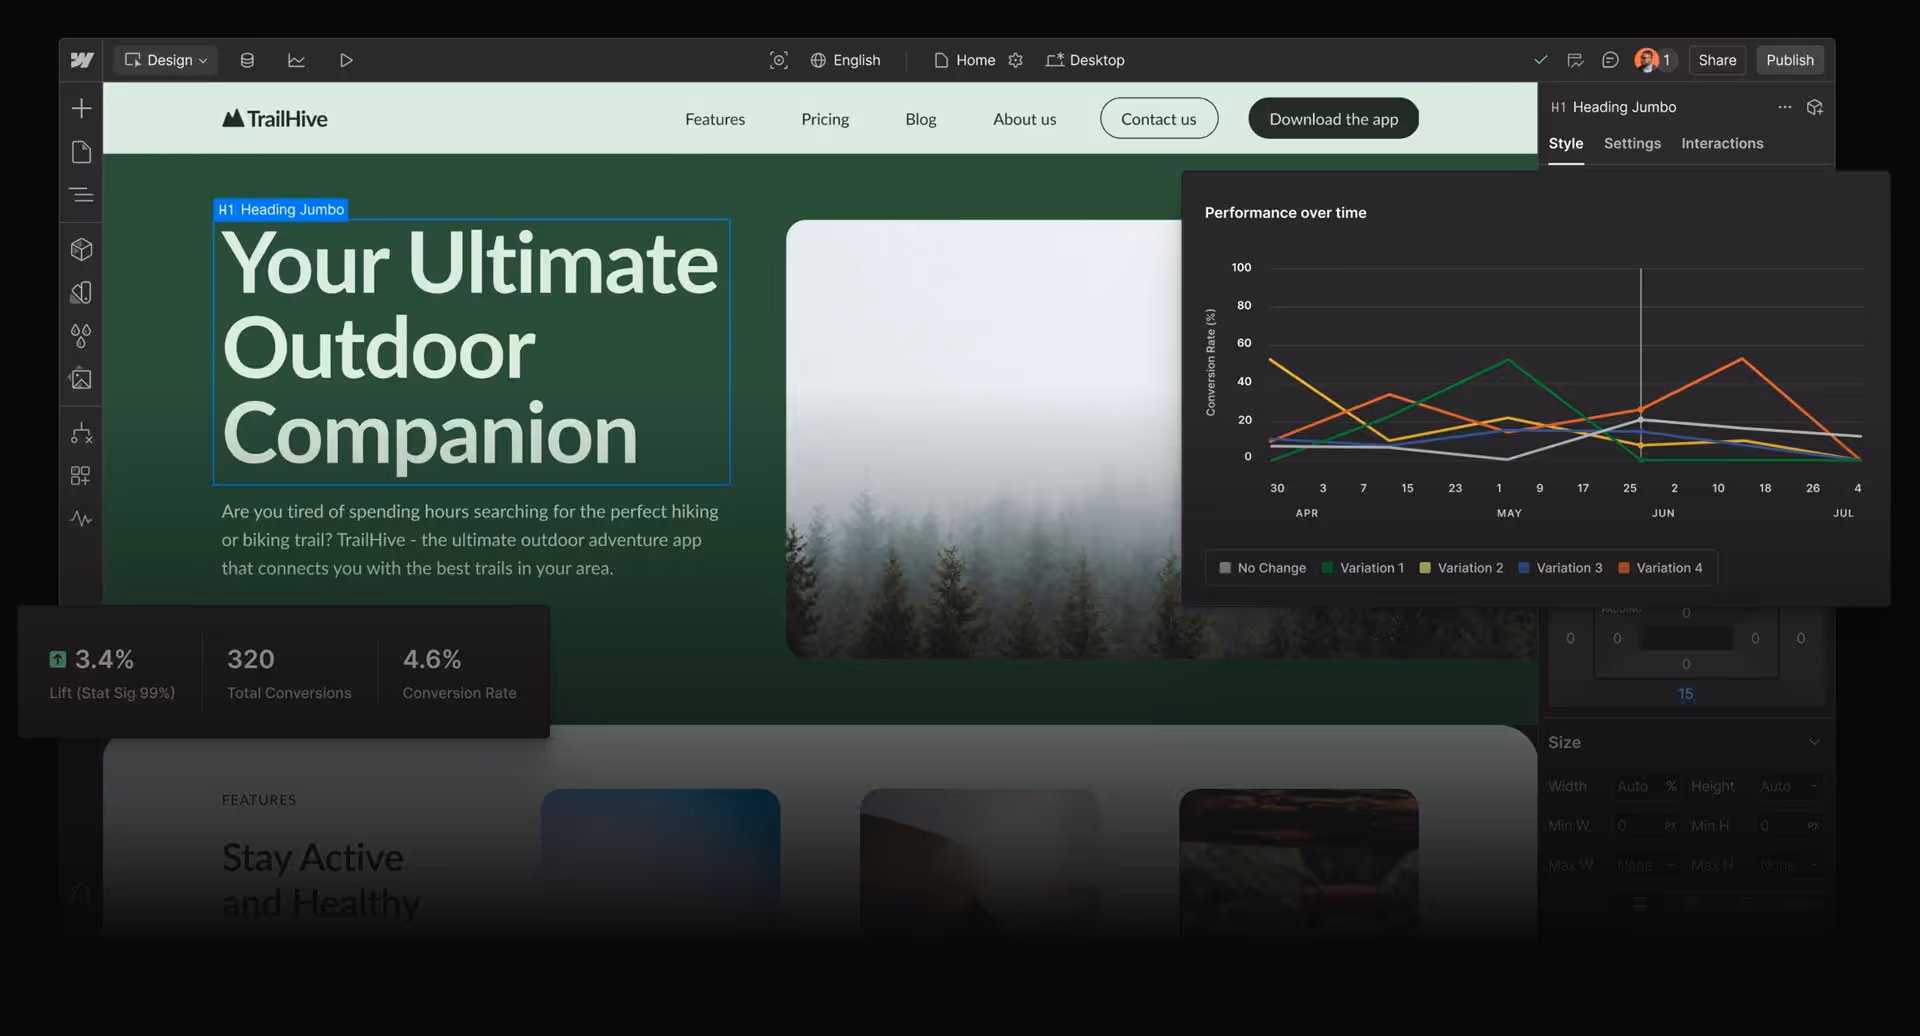
Step 3: Set Up the A/B Test in Webflow Optimize
- Navigate to Webflow Optimize and create a new test.
- Choose the type of test: on-page variation or split URL.
- Define your audience split (50% see Version A, 50% see Version B).
- Connect it with Google Analytics 4 or Hotjar to track results.
Step 4: Run the Test & Monitor Performance
Once the test is live, track key performance indicators (KPIs) such as:
- Conversion Rate – Are more users completing your desired action?
- Click-Through Rate (CTR) – Are users engaging with the new variation?
- Time on Page – Is user engagement improving?
Using Webflow Optimize alongside Hotjar can provide visual insights, such as heatmaps and session recordings, to better understand user behavior.
Best Alternative Tools for A/B Testing in Webflow
While Webflow Optimize is a powerful built-in tool, combining it with external platforms can enhance your testing strategy.
1. Optimizely – Enterprise-Level A/B Testing
Optimizely is an advanced A/B testing tool perfect for companies needing:
- AI-driven personalization for different audience segments
- Advanced multivariate testing beyond simple A/B tests
- Integration with Webflow (requires manual setup)
Best for: Large-scale Webflow projects where precise targeting is needed.
2. Hotjar – Visual Behavior Analysis
While Hotjar is not a direct A/B testing tool, it helps you understand why one variation performs better than another through:
- Heatmaps – See where users click, scroll, and interact
- Session Recordings – Watch real users navigate your test variations
- User Feedback Polls – Gather direct input on design changes
Best for: Adding qualitative insights to Webflow Optimize experiments.
3. Optibase – Webflow-Specific Testing Tool
Optibas is a Webflow App Marketplace tool designed for native Webflow A/B testing. It enables:
- Easier split-testing setups directly within Webflow
- Performance tracking without external integrations
- Faster experimentation on landing pages and CTAs
Best for: Webflow users who want a no-code A/B testing experience.
How to Get the Best Results from A/B Testing
- Test One Change at a Time
If you modify multiple elements at once (e.g., CTA + headline + layout), you won’t know which change caused the result.
- Run the Test for a Sufficient Duration
Tests should run at least two weeks (depending on traffic volume) to reach statistical significance.
- Segment Your Audience
Use Webflow Optimize with Google Analytics 4 to analyze results by device, traffic source, and user behavior.
- Analyze & Implement the Winning Variation
Once the test is complete, apply the better-performing version permanently and iterate on new ideas.
A/B Testing Is a Continuous Process
Successful Webflow sites aren’t built on assumptions, they’re refined through constant testing and optimization.
By using Webflow Optimize and leveraging external tools like Optimizely, Hotjar, and Optibas, you can:
- Make data-driven improvements
- Increase conversions with proven strategies
- Build a website that evolves based on real user behavior
The key to success? Keep testing, keep optimizing, and let the data guide your decisions.
.svg)
.svg)